When I was a kid I thought it would be cool to be an archaeologist. I imagined myself crouched over dinosaur bones and priceless artifacts, brushing away dirt and sand to slowly reveal clues from the past....what was I thinking? That sounds awful!
Sure, it might be fun for a few minutes but after that your back starts hurting you just want to get a shovel and get things moving. I say that because you have to be part archaeologist to successfully grow dahlias.
The greatest thing about dahlias, other than their beauty, is that they multiply every year. Maybe they don't produce a lovely scent like some pretty flowers but at least they're not lazy! I know that daylillies, daffodils and other flowers multiply but they don't have anything on dahlias.
These are all from my garden this and last year. I am obsessed with growing dahlias. SADLY- I made mistakes last year by thinking we were in a warm enough area that the tubers could overwinter in the ground. MISTAKE. They all turned to mush and I had to buy new in the spring. Waste of money and gorgeous flowers.
When you order dahlia tubers you pick by staring at hundreds of amazing flowers and then you get this in the mail-
These are dahlia tubers packed in sphagnum moss.
To plant the tuber you dig a 6in deep 1 foot diameter hole and place the tuber at the bottom. If it's a tall plant it'll need to be staked or provided with support of some kind. Then you fill the hole with good light dirt and wait for them to grow. My garden's natural dirt is nothing but heavy clay which is why I dig deeper and wider and fill in the difference with good light dirt.
At the end of the season, as soon as the first frost hits the dahlia plants will go from this-
To this overnight-
Then it's time to dig up and separate the tubers, a daunting job! Today I paid my dues and excavated all of mine. You may start with one horizontal tuber but they multiply like Mogwai and bloom into a bushel of tubers shooting in all directions. It's really amazing.
This is about 10minutes in when I had to start working with my hands to avoid nicking the delicate tubers.
I thought I'd dug a wide enough hole but the new tubers grew into the thick clay making the excavation even harder. This next photo is after another 10-15minutes of brushing away dirt-
If I had perfect dirt I could do what other people do and pry the entire thing out with a pitchfork but alas, the thick clay is like cement so no dice. Here's the final product after a total of 30 or so minutes and one or two broken tubers that didn't make it.
The final step in the process is to divide them up and store them for winter. I need to do that tomorrow so for tonight they're still intact in their winter homes of sphagnum moss filled paper bags. I made the mistake of trying to store one survivor from last year in a plastic bag filled with sphagnum moss and it turned to mush. They need air and regulated moisture. They're very finicky so I guess they are a lot like having a Mogwai!
I've already gotten my tubers mixed up during the process, shocking I know, so it'll be a surprise to see what blooms where after I plant them in the spring!
Two weekends ago I did a complete hive check. I hadn't bothered the bees in over two months. Beekeepers are supposed to check the hives monthly but I'd walked out there and seen a lot of pollen gathering activity at the entrance so I knew they were okay and wanted to let them stay on a roll.
The first step in a hive check (and again, this is my first year so I am constantly learning, improving and in no way an expert) is to get the smoker going good. I'm nothing without that smoker! Also my bee suit, I'm nothing without the bee suit! I need to order those little smoker pellets because the old fashioned way of gathering pine needles is pretty time consuming and takes a while to get going.
Once the smoker was puffing away, I started by removing the top inner cover. Then I removed the top box (called a "super" in beekeeping jargon) and looked inside it and inside the lower brood box.
The bees make a substance called propylis that is like a super sticky glue made from pollen. They use it to fill even the tiniest holes in their hive to keep it airtight. It's like caramel, it gets gooey in hot weather and super hard where you have to crack it apart in cold weather. That's where the hivetool comes in, you have to pry each frame off the box ledge to lift it out.
When I finally got a look at the top box frames in the daylight I saw that they are FULL of honey!
The end frames are halfway full on one end and empty but starting to get filled on the other. The frames above are pulled from the sides. Here's what a frame looks like when the bees are just starting to build the honeycomb to fill with honey in the top box-
Bees always keep their brood on the bottom and their honey at the top. After checking to make sure that they had plenty of honey and sufficient brood comb I looked for the queen- no success and then did the same thing for the other hive. The other hive was NOT in the mood to be trifled with- they started getting into swarm formation flowing over the bottom super so I smoked the hell out of them and kept the visit short.
I really need a bee mentor. I'd love a sassy old lady with grey braids to tell me what I need to do better- alas...I may just have to start going to the local beekeepers meetings where I'm pretty sure it's just going to be me and a bunch of old guys. No offense to old guys! If they're anything like Clint Eastwood in Gran Torino we'll get along famously. I even have a porch where we can drink beer and judge America's youth. Until then, I'll keep feeling my way through this.
Warning: In Gran Torino style, there is a curse word in the first 20 seconds of this video. What do you want from me? It IS effing fascinating, okay?? :)
*Many thanks to my patient videographer for braving the bees to briefly document this inspection!
The learning curve in gardening is pretty severe- I feel like I was in elementary school last year and now I'm taking the SAT's. My ONE hoop house last winter/spring season was a learning experience.
The hoops weren't high enough which meant that in the spring when it was even a little warm it would be blazing in the hoop house with not enough air circulating above the seedlings and plants. I scorched many a seedling.
This time around improvements were made- we went with a 6mm thick white plastic that's pretty rigid and resembles wrapping paper vs the flowing thin, clear plastic from last year.
We also lengthened the hoop tubing so it sits taller overall.
All materials were bought at Home Depot- our home away from home where I now have Rainman like abilities in that I can tell you what aisle to go to for just about anything.
The tubing is sold as a coil- we cut it with heavy duty tree pruning clippers. Here's a close up of the details:
We hammer shim-like pieces of wood into the ground and force the tubing onto them.
Ms. Jo, the farm cat, approves of the new construction.
I'm covering 4 beds for the winter and keeping materials to start a 5th and 6th for spring seedlings. The winter hoops are protecting lettuces like Arugula, Leafy green, Romaine and other cold hardy things like Cilantro and Dill.
The bed above can be credited to my patented "Lazy Gardener" technique of letting the lettuce bolt and throw it's seeds all over so that the bed repopulates itself before fall. Lazy...and brilliant!
Most of the other beds have room in them so over the next few weeks I'm going to try and start a few things that do well in the cold like carrots and beets.
This is not my garden, this is just my favorite garden picture. I love looking at it and imagining that it IS my garden where everything is perfect and orderly and all it took was one chick in a hat. Last year I planted things directly into the ground with no border or raised beds. Some things did well but most were quickly overtaken by creeping grass and weeds. For example, here's a bean bed with weeds working their way in.
In an effort to keep them at bay I tried putting down weed blocker which does work very well but weeds can start to grow even if a sliver of light gets through and then it sucks to try and pull them from between the slits.
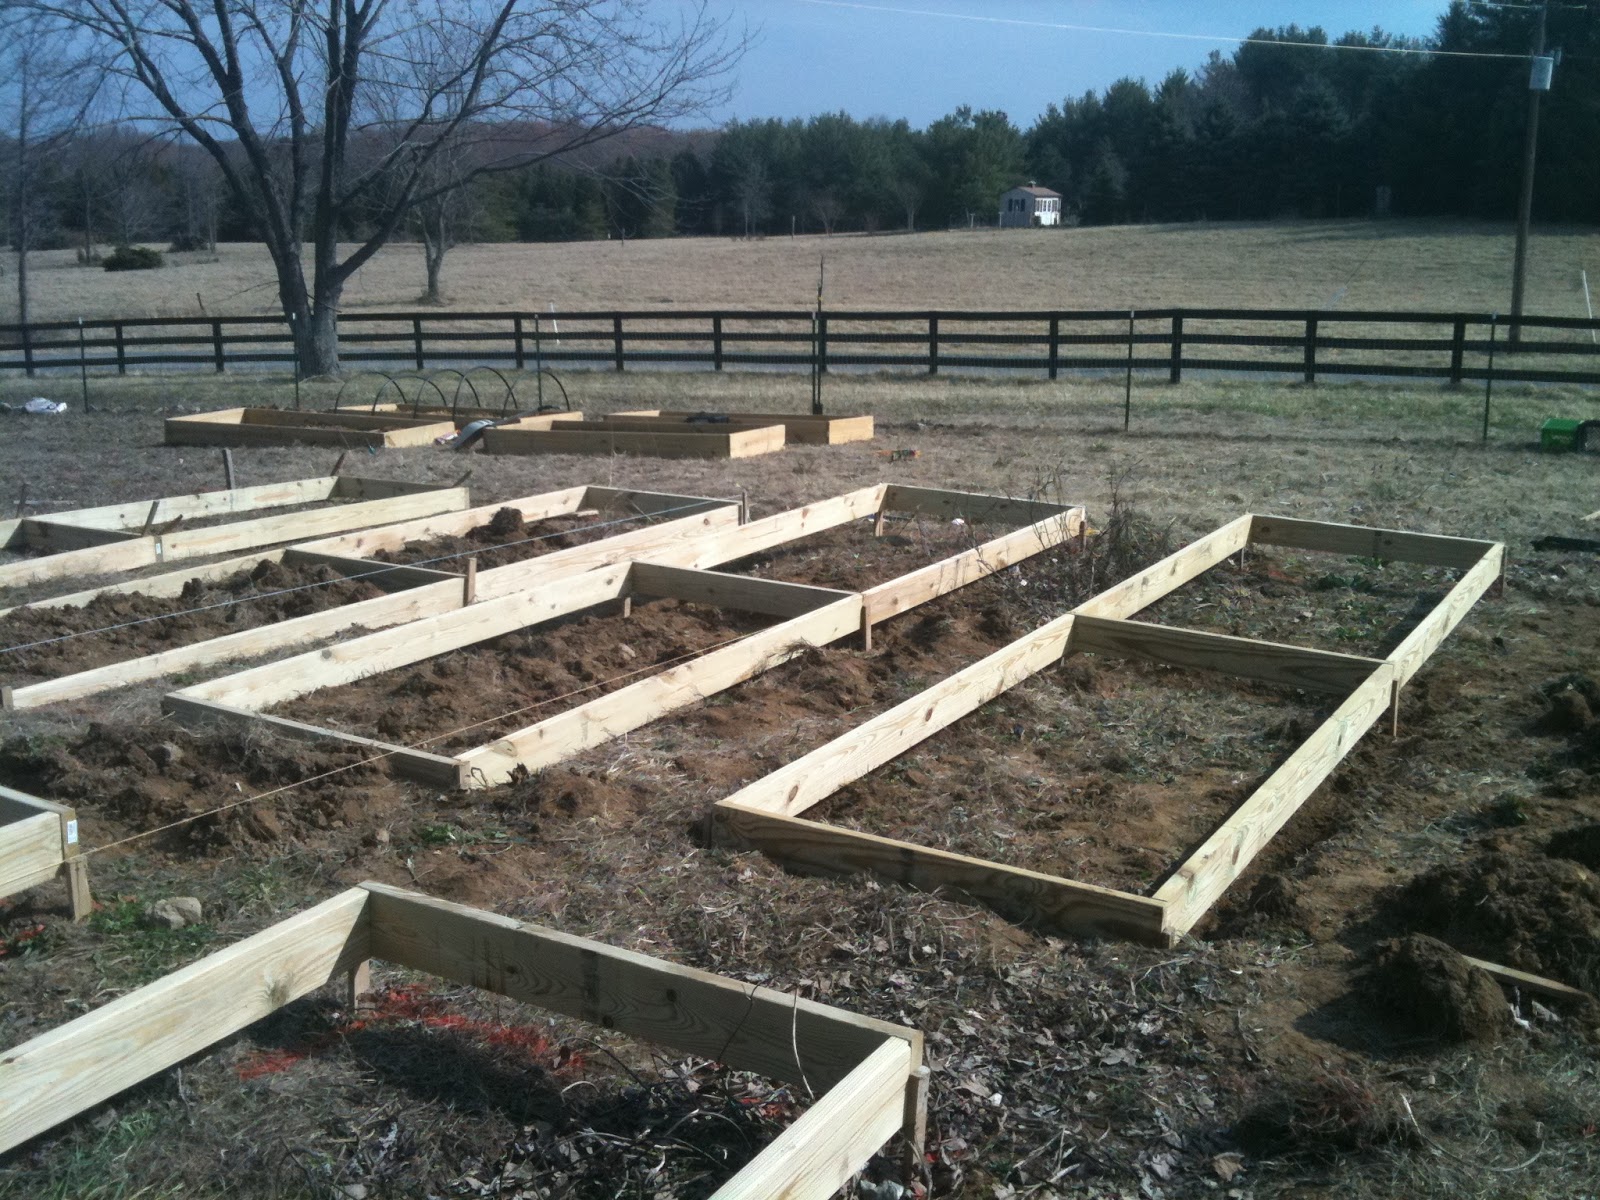
Just before the winter my lovely Louis built me these raised beds so that I could experiment with hoop houses. The farther bed was used for seedlings in early spring and the second I planted with garlic. These are 8x4ft rectangles made with pressure treated eco-friendly 2x12 planks from Home Depot. The 12 in depth is ideal for root-heavy produce.
The raised beds were so great to work with that I decided the whole garden should slowly get morphed into a raised bed garden- some things like corn, squash, watermelon, pumpkin and flowers excluded. SO after buying a lot of lumber and meeting a handyman down the street who helped us, we went from this:
To this:
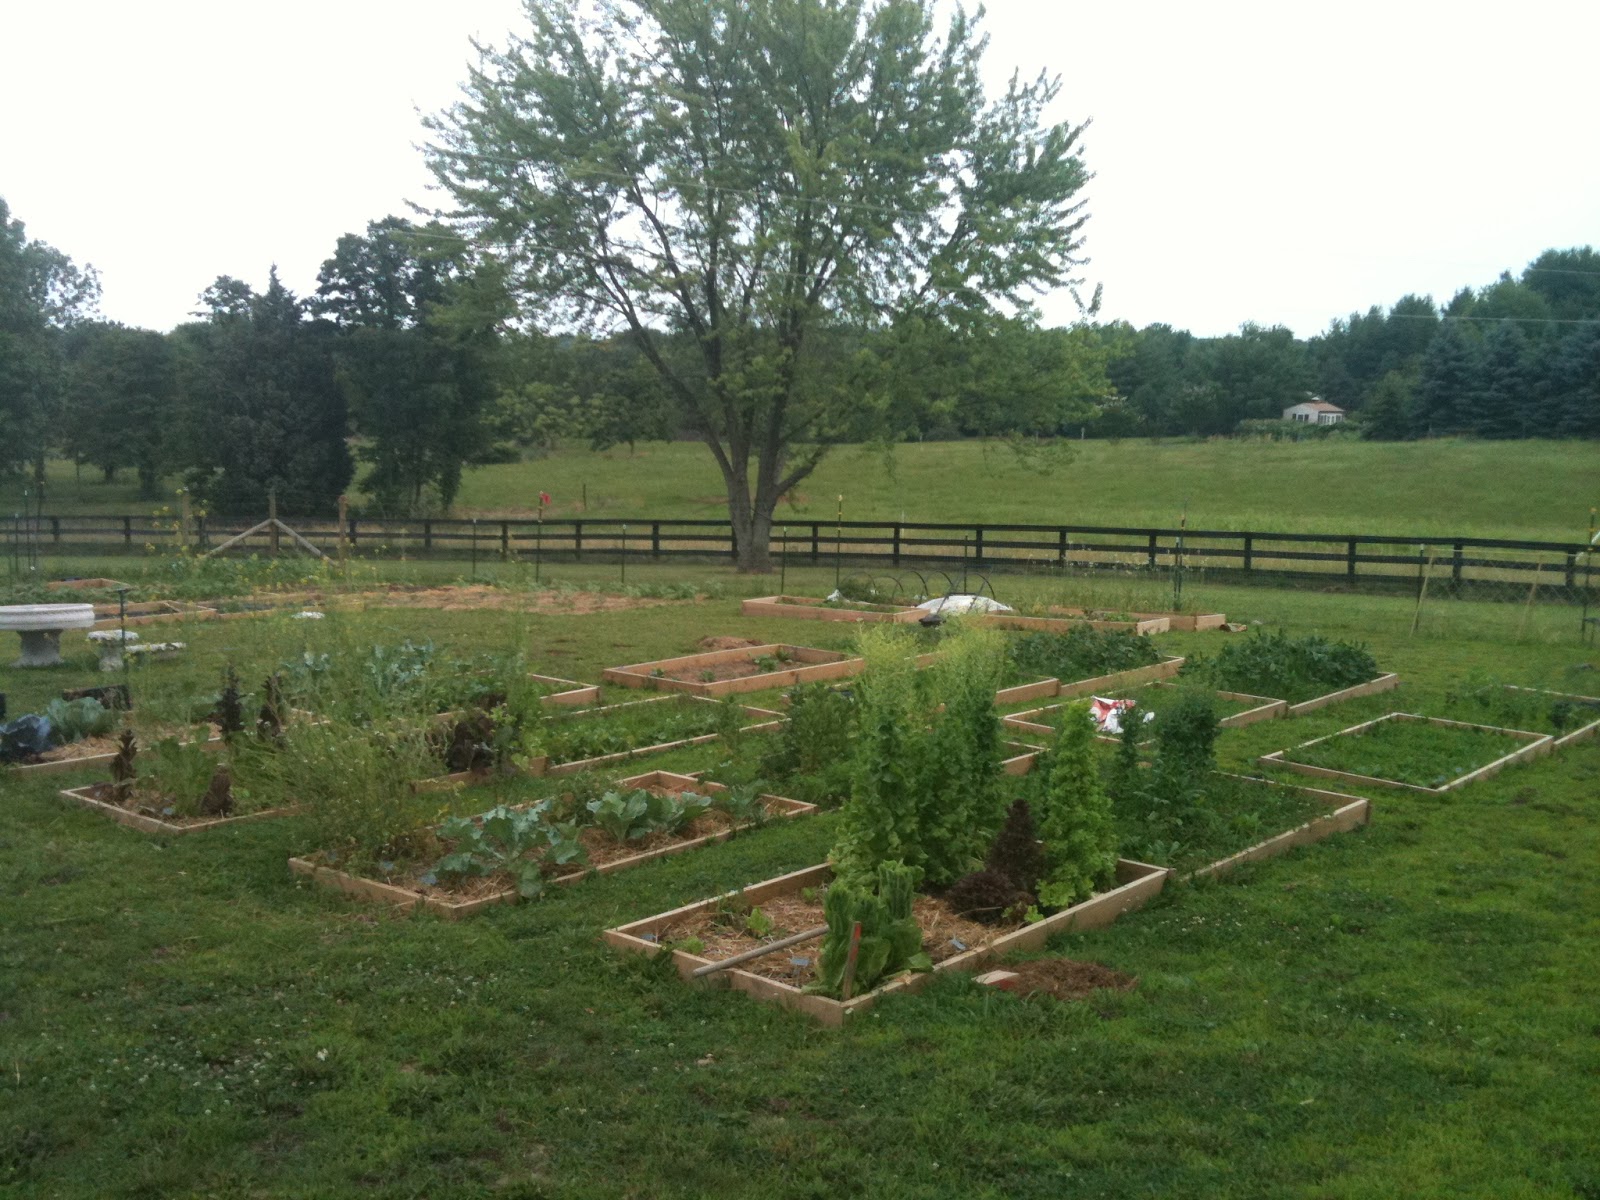
To, finally, this:
Its heaven to me. I love working out there after a long day of staring at a computer like Dilbert. You can see the fountain I bought that's still not put together, it's just hanging out in the center of the garden waiting to be stacked and set up properly in it's stunning 5 tier state. My overall plan for the garden is to have flower beds in the middle with the fountain at the center of it all. Maybe next spring- there's not enough time to do it all!
The boxes for the rest of the garden were made in 8x4 boxes but this time we used 2x6 planks....in hindsight, we should have stuck with 2x12 planks. We didn't realize how intense the sloping got in some areas, we had to dig down with a spade to level them which means that some ends of the boxes are almost level with the ground while the other end of the box is 4-5 inches above ground level. over time I'll just add a plank level so it'll all work out but for now it's a lot of work to keep the grass from growing straight over some of them.
Those giant green things in the picture above are what lettuce looks like in late July after it's "bolted" and "gone to seed". All that means is that they turn into giant dandelions - the lettuce gets super bitter and the plants send out fluffy seeds from the top. This is what it looks like a month before-
Those little specs in the picture above are crushed eggshells to keep slugs away. One thing we have an abundance of is banana sized slugs- they won't crawl over anything sharp so eggshells are an easy way to keep them from taking over.
The boxes have made things a lot easier but as you can see in between the egg shells, grass still finds a way in so I still have to pull it out pretty regularly. Putting straw down didn't really help but it was worth a shot. I do think that the straw helped with maintaining moisture levels.
I've debated what it would take to put down pebbles to replace the grass walkways and it's an undertaking. Especially because my garden plot isn't level- it slopes down gradually. You can kind of see it sloping in the picture above. Here's another favorite garden porn picture I like to stare at for pebble inspiration.
From what I can tell, level is pretty important in the gravel ones so I'll stick with what I've got. Pebble looks pretty but the vibrant green of fresh cut grass is great too.
As of an hour ago I finally finished canning all my excess tomatoes and bell peppers. They are now 22 jars of kick ass salsa and 5 jars of deeelicious pasta sauce. I'll share those recipes in my next post!
This spring I started two bee hives. It's challenging and sometimes unnerving but I love it. I have a lot to learn but the bees fascinate me. They're pretty self sufficient so my job is to help them a little when they need it and mostly stay out of their way. The picture above is of one of the bees pollinating my pickle vines. This is a shot of one of my hives during a check-up.
I set the hives up in a horse run-in shed at the very back of the property. The winds are incredibly strong in the winter and I didn't want them to have to exhaust themselves to stay warm when the cold comes. It should provide them with a nice little wind break and it keeps people from seeing them. You'd never know they were there!
Painting the hives was easy compared to introducing the bees to their new homes. It's described as a "relatively simple" process and by the time I got my bees I'd watched a ton of videos of beekeepers which did not keep my efforts from ending in tears. It was all because of the damned mini-marshmallows. You see- mini-marshmallows are the lynchpin to starting a new hive. Who knew right?
5 Things you need to start a beehive- listed in order of importance:
1) Balls (figuratively speaking)
2) Bee suit
3) A small screw or nail
4) Mini marshmallows
5) Sugar syrup in a spray bottle
To start a hive you have to buy packages of bees from a beekeeper. The bees are in a small wooden and mesh box. Each of the boxes below are filled with 5,000-7,000 bees. This picture is from my bee dealer's shop about an hour away in the middle of absolute nowhere. I was lucky to get bees this year, they've been sold out for the past two years- beekeeping is the new black apparently.
The bees in the box buzz around the queen who is suspended in her own mini wooden box hanging in the center of the larger container by a plastic string. Here's my bee dealer's collection of queens waiting to be hung in their boxes. Each little box is about 2inches long by 1 inch wide and has one queen inside. There's a tiny hole at the bottom of the little box plugged by a teeny piece of cork. THAT's why the mini marshmallow is crucial. When the time comes, my job is to QUICKLY pop out the mini cork when the queen isn't looking and replace it with a mini marshmallow that the other bees will eat away to get her out.
Here's a close up of the bee boxes I got. The bees are usually hungry and pissy from being stuck in a box and manhandled so the first order of business after loading them in the car was to spray the mesh with sugar syrup- half water/half sugar that I'd put in a spray bottle just for them. They love it. You mist them and immediately all buzzing stops because they're too busy licking it off themselves. It's pretty cool, like throwing money in a club but not.
The bees close up after a misting of sugar water.
An important part of beekeeping is knowing when to mess with the bees. You shouldn't bother the hives unless it's sunny and between 10am and 2pm, that's a general rule because if it's cloudy or raining or close to wake up or bed time all the bees are home when you come knocking - it's better for the majority of them to be out and about. That logic sounds good to me so I stick to it. The only time that rule doesn't apply is when you're starting a hive, that should happen closer to sundown so the bees don't fly away looking to gathering pollen and nectar. They need to want to get ready for bed.
Here's a video of a pro in action so you can see how things were supposed to go, the action really starts around the 2min mark and the marshmallow explanation is at 5:50-
SO- back to my story- it's an hour until sundown, I've got all 5 of the things you need to start a beehive and I'm ready to roll. I haul all my stuff down to the run-in shed and open the top of the first bee box exposing the syrup can, UNLIKE the uber ballsy man in the video I did not smack my bee box really hard, mine was more of a tap, perhaps that was my first mistake.
When I pulled the syrup can out my bees started flying all over. Then....the plastic strap broke and the queen's mini box fell into the mound of bees below. I had to stick my hand in the mound and try not to squish bees to get her out. It was horrible because my main goal is to be quick but not kill any bees which is nearly impossible.
Fifteen minutes in and I'm in a full sweat in a bee suit which is like being a character at Disney. This is the kind of suit I wear. If a bead of sweat is tickling your eyebrow there's absolutely nothing you can do about it. Nothing.
After making it through the Temple of Doom test I still had to make the mini marshmallow swap. I reached for the bag of mini puffs of sugar and felt a cold chill....I'd forgotten the damned mini marshmallows. I left them in the house. Please note in the picture near the top how very far away the bee shed is from the house. Now imagine running it as fast as you can in a bee suit. That's what Louis did as I stood calmly being covered in bees as I held their queen, their one reason for living. Louis had come to watch me and take video which he started to do but when the queen fell there was a decent amount of cursing so it wasn't salvageable.
Here's what mini marshmallows look like:
Here's what big marshmallows look like:
One of these will work as a temporary cork in a teeny queen box and one won't. Which do you think Louis brought me? That's right, the giant ones. By now the sun was setting, I'm covered in pissed off bees staring at a sweaty Louis holding a bag of giant marshmallows and I still have one hive to go. FML.
I ended all communication with Louis and ripped off a small piece of a big marshmallow to try and use in the nail/cork/marshmallow swap. It stuck to my gloves and wouldn't stay in the hole, kept ripping out because it's a sticky bit of a big marshmallow and not a mini one. By now I'm sweating and shaking and starting to freak out like I hadn't since my first prom when I tore my hairdo out 20minutes before my date showed up. I can be really fun sometimes. I rubbed my glove on dirt to stop the sticking issue and finally it stuck in the queen box instead of on me. Louis was still mumbling that the mini marshmallow bag was NOT in the pantry as I heard mostly ringing and my heartbeat as I powered through starting the second hive.
The second hive went much better but still not as it should have. I wasn't calm, I wasn't connected to nature and at ease like I hope to one day be when I handle the bees. I was on shaky auto-pilot that, after robotically walking into the house, into the pantry and tossing the goddamn bag of mini-marshmallows at Louis ended up in a weepy shower.
Thankfully that was my hardest task of the year since you don't harvest honey until the second season. One good thing about a really rocky start is that everything I've done for them since then has seemed pretty easy. Let's hope it stays that way!
Here's another picture of their queendoms when I was setting them up to be level.


